Thursday, January 31, 2013

Letter Writing

I appreciate the lost art of writing letters and I would love to bring back. Unfortunately, I'm certain I cannot single-handedly do this. I will, however, give it my best shot with this fantastic idea.

The idea is to: Create & Customize Your Own Writing Paper - this is just a tumblr post, so here are the directions, as written on Pinterest:
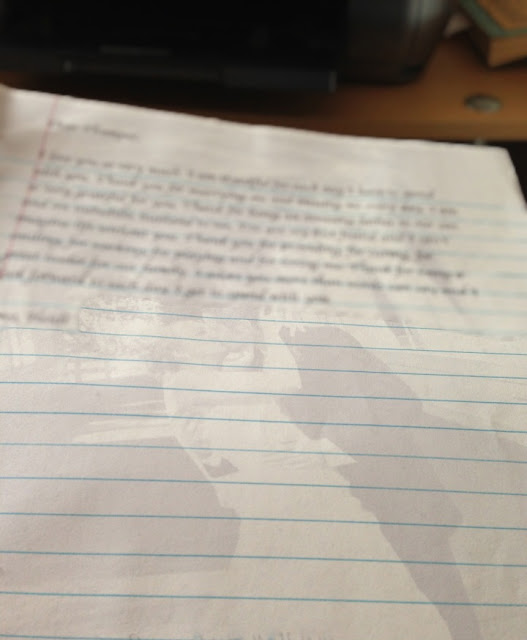
To create “washed out” pictures, I copied and pasted a picture onto Word, selected “Format Picture,” selected “picture,” than under “image control” and “color” dropdown box, selected “washout.” Print and write your letter! This is amazing! 
Very simple idea, but having a Mac computer and a newer version of Word, some of my formatting options needed to be tweaked just slightly. Here are my slight changes: In order to format the picture to be the size you want it to be, you will want to start with the layout option as "in front of text." After you have sized it however you wish, I would go ahead and change the layout option to "through text." (That way, we can add a text box to it if we wanted!) 

The next thing I had to do was select "Picture Color Options" and in that box, select "Change Recolor Option to" and from there, changed it to "washout." From there, you can change the transparency options as well, if the picture is too dark. The first attempt I made, I used a color picture - a picture that had beautiful vibrant colors and all of us looking toward the camera. It did not translate well onto the paper - but you can see it worked! 


My recommendation would be to use a black and white picture with strong lines or maybe go with something artsy, without direct contact with a face - if that makes sense.  Like this one that was taken nearly 6.5 years ago when I married the man of my dreams. 


This picture seemed to work way better! I printed it out for my husband and wrote him a little note - but the note part of it has been fuzzed out. That's for his eyes only. :)


One more thing - did you know, you can type on the same paper?! Now, I realize that loses a little of the personalized appeal due to lack of your own hand-writing. But, how cool is this?! All you have to do is - once your picture has been changed to "through text" - insert a text box and starting typing to your heart's content.

There's no rule that says you have to use lined paper either. In fact, the lined paper was a tad (very tad...like, barely noticeable tad) difficult because it was smaller than my printer paper drawer sizing. It did work, obviously, but it isn't an absolute must other than the cuteness factor of it.


So, here's a challenge for all of us: let's all write a personalized letter today and make it elegantly or cheesily our own. Whoever receives a lovely hand-written (or typed) picture-personalized note will be ever-so happy to have received it and you may just brighten someone's day! 

Now if you'll excuse me; I'm going to go write some more letters on my fancy new personalized stationary. 

Wednesday, January 30, 2013

Homemade Floor Cleaner

I would love to be able to eat off of my floors...and now I may be able to (just kidding...I'll never truly be able to do that...beyond the normal 5 second rule)! This homemade mop soap, also known as floor grease cutter cleaner, is really great. It's easy to make (taking no more time than it would to add in some pine-sol to your water) and with the added dish soap, it doesn't smell funky from the vinegar.


I was very impressed with how clean (and not sticky) it made my floors feel. I've never really thought of regular mop soap as making my floors feel sticky, but after using this - I think the store-bought stuff didn't work quite as well as this. It was great. The only down side is, I love the smell of a freshly mopped floor. It feels like when the floor is mopped, the whole house has been cleaned, just because of the lovely aroma. This does not have a strong enough fragrance to invoke that feeling. So, alas, I had to continue cleaning the rest of my house even after the mopping was done. *Sigh.*

Either way, it's great. The other benefit that I really like is you really can use this formula for pretty much all the rest of the cleaning! I used it to wash my blinds not too long ago and to wash off my counters and wipe down my bathroom. It's amazing. Really, the magic ingredients are the vinegar and baking soda but adding in a little bit of dish soap sure does help with the smell.

I do still go back and forth between this floor cleaner and my store-bought stuff, just because I do miss the smell once in a while, but overall - this is my cleaning formula of choice. Give it a try and see if you notice a difference.

Tuesday, January 29, 2013

Meatless Dish - Spinach Artichoke Pasta

I tell you what, coming up with meatless meals is a true challenge for me. But, once again, we pulled it off. We being me and Pinterest. Thank you, dear Pinterest!

Last night's dinner of choice: Spinach Artichoke Pasta. This is a Pioneer Woman dish. I've had some friends talking about how good Pioneer Woman dishes are, and this is no exception. She mentions the fact that this is like a spinach and artichoke dip, but with pasta instead of chips...and she's pretty accurate on that account, I'd say.

Cook and prep time totaled probably close to 40 minutes, and that's with being constantly in the kitchen. This is not a set it and forget it kind of meal. But, that's ok. It was worth it. 

I think next time I will try putting some sun dried tomatoes in it. I only used one bag of spinach instead of two because I'm not a huge fan of cooked spinach and I think I made the right choice. I certainly wouldn't double that amount, seeing as how both my husband and son did what they could to eat around it. Silly guys. The recipe also calls for two cans of artichoke. I think I would've been good with one can. Two made the dish a little artichoke-heavy. Just the same, it was very tasty.


My husband noted something that had me very excited about this dish last night: the sauce tasted like something similar that we both really enjoy at a restaurant at Disneyland! I hadn't thought about it until then, but he was right! Add some chicken and some sun dried tomatoes and turn on some Disney tunes and you are practically enjoying the sunshine and visiting the main mouse himself! 

Ok, so this dish was good, but thinking about making a DISNEY DISH in my own home made this meal even better than I expected and was an added bonus for me. Have I mentioned that I am a Disney nerd yet? Yeah...if it's Disney, I pretty much love it. 

Back to the main point - if you are full-fledged vegetarian or a full-fledged carnivore wanting a break from the meat for a night, I'd recommend this yummy dish. Especially if you are a spinach and artichoke loving gal or guy. We will definitely be trying this one again, with a few alterations in the mix. 

Monday, January 28, 2013

Hair straightener holder from a pot holder

Are you one of those people that can't leave the house without making sure your hair is just right? Do you find that it is difficult to accomplish this when you are traveling to or from a destination and your destination requires you getting up before the sun is even up in order to beautify yourself before you can truly pack everything you need for said trip leaving you with the conundrum of whether you have time to use your straightener or curling iron and still have time to let it cool down and pack it before you leave? I don't often travel. However, when I do,  I like to take my flat iron because beautifying does not get a vacation. Unless I'm at home. Then, hello pajamas, no make-up and chocolate! Yeehaw!

Anyway, as stated above, sometimes it's unfortunate the amount of time you need to wait to put that hot iron into your suitcase for traveling because of it having just worked hard for you and needing some time to cool off. Cool off time is no longer necessary!

Introducing the Flat Iron Holder. This project was so easy and simple. I don't know why I didn't think of it. I tell you, sometimes I just need things spelled out for me. 

All you need is a pot holder and a very small amount of sewing skills. I bought a pot holder, and decided to embellish it using my amazing silhouette cameo fabric ink kit and once that all dried, I sewed it together as described in the link above. 


The sewing was very simple and took very little time; sewing down one side and around the bottom half of the pot holder. 


And, voila! Completed! This project took maybe 10 minutes, other than the painting which was just an added perk. So simple, and such a great idea. Granted, I doubt I will put my hot iron in immediately after use, but still, the reassurance that even if it's still warm it (and everything around it) will be safe makes this a fantastic project and I'm very excited about this. I have not tried this with a curling iron since I don't own one, but I'm assuming if you buy a big enough pot holder, that should work with this idea as well. 


Some people may think this idea is silly, I mean really, who can't go without their flat iron for a day? But, there are those I know who will be thrilled with this because...yeah...really there are those who can't go without their flat iron for a day. Whether you are one of those or not, this simple project is worth a looksy, and may just be a great gift idea as well.


Sunday, January 27, 2013

Slow Cooker Oatmeal

When I was young, I loved waking up to the smell of breakfast being made. There's nothing quite like getting out of bed and enjoying some warm, tasty, homemade breakfast. In steps adulthood to crush the dreams of ever waking up to a warm breakfast pretty much ever again. Or, at least until my son is old enough to bring me breakfast in bed. Isn't that why we have kids? Moving on...

So, when I saw this pin, I looked forward to trying it. Granted, it's oatmeal, so I didn't expect it to have much of a smell, but it's still waking up to a warm breakfast and I love the idea of not having to cook first thing when I wake up, but still have the luxury of a warm, freshly made breakfast.

The recipe doesn't actually go to a link, so I'll just write it out here:  "Throw 2 sliced apples, 1/3 cup brown sugar, 1 tsp cinnamon in the bottom of the crock pot. Pour 2 cups of oatmeal and 4 cups of water on top. Do NOT stir. Cook overnight for 8-9 hours on low."


This was not stirred, but the water did move things around a bit when I put it in. I only used one apple as I have discovered I am not a fan of apples in my oatmeal, but I wanted to give this recipe the benefit of the doubt and tried it again. 

This morning when I woke up, my son and I made our way downstairs to eat some breakfast. (As I think I've stated before, my husband is not a fan of breakfast, so he opted to not eat any oatmeal and settled for a small yogurt instead.)


I added some milk to it and a little white sugar and took a bite. Then I offered a bite to my son. He immediately went over to his daddy for a bite of yogurt. Apparently, this dish did not satisfy his hunger. I can't say that I blame him; it did not satisfy mine either. The brown sugar and cinnamon were still on the bottom of the crockpot (except for the little bit that I scraped and put in my bowl) and the dish was very bland. Granted, oatmeal generally is bland; however, this tasted  as though it did not have any flavor to it at all. The apples were very tender like applesauce, which I would assume is very good if I liked apples in my oatmeal. Turns out, even when they are cooked this way, I'm still not crazy about them in my oatmeal. Huh. 

My quandary now is - if I had stirred the ingredients (as the directions said not to), would the brown sugar have been more taste-able? I'm not sure of the answer. And, honestly, I don't intend to find out. Oatmeal takes practically no time to make in the morning and this just dirtied up a bigger pot than necessary. So, I'm thinking I won't make this one again. Maybe with other ingredients it might be better, but as it is - I'd say this one was a thumbs down and I will go back to making my oatmeal in the morning where the flavor has not been totally cooked out. 

Good thing I still had Loaded Breakfast Biscuits in the freezer to tide me over until lunch! In conclusion: say no to slow cooker oatmeal (at least this recipe) and say yes to...yogurt? Or Loaded Breakfast Biscuits. Or Cold Pizza. Or, whatever your fancy may be. 


Friday, January 25, 2013

Homemade Olive Garden Dinner

We had a yummy feast at our house the other night: Pasta e Fagioli & Breadsticks. Both, boasting to be replicas of recipes from a favorite restaurant among many: Olive Garden.

This post is gonna be a double whammy.

First, I started with the breadsticks. I found this recipe at http://www.chef-in-training.com/2012/02/olive-garden-breadsticks/. I started with the breadsticks rather than the soup as the dough needed to sit for about 45 minutes, so it worked well timing-wise. I could not believe the simplicity of this recipe. It was incredibly easy, surprisingly quick and even I, who has been known to botch a yeast-filled recipe more than once, didn't mess it up too bad. Here are the breadsticks when they were all done:


So, obviously they weren't as pretty as Olive Garden, and I can improve them more, but overall, I'm pretty pleased with them. The blog did call for 1 stick of unsalted butter, 2 tsp of garlic powder and 1 tsp of salt. I halved that, and my breadsticks still had plenty of buttery/garlicy goodness to them. The only thing I wasn't crazy about: they were VERY heavy. Definitely not light like you would expect. They were almost a meal by themselves. I am certain this was an error on my part and not the recipe as I truly am awful when working with yeast. I'm hoping one of my amazing friends reading my blog may be able to direct me on how to prepare bread that isn't as heavy as bricks. But, in the meantime, the good news is: they still tasted quite yummy!

And now, onto the main course: Pasta e Fagioli. This recipe can be found at http://farmgirlinthesuburbs.blogspot.com/2011/02/pasta-e-fagioli.html.

Simple, delicious and easy to make - just my style! Here it is ready to simmer for one hour. Mmmm...so good.

About 10 minutes before the meal is ready, you will want to add your noodles. The pasta it calls for is Ditali Pasta (but for all us simpletons, that's just a fancy way of saying macaroni salad pasta.)

You do NOT want to add the pasta in sooner then that or the pasta will suck up all the soupiness and you will have a pasta with sauce rather than a soup with a bit of pasta in it. Or, if you do want to add the pasta sooner - I just heard from a friend that if you cook the pasta first, you don't have to worry about it cooking more in the soup! Awesome tip!

I have to say, this dish was simply divine. I am not sure if it is the same as Olive Garden's as I have never had that dish there. But, I will be making this again. One thing about it: I pretty much always add salt to my dinner (it's like its own food group for my family, as my husband says). But this dish did not need it. It had just the right amount of flavor and texture and goodness. Mmmm mmmm mmm.

I forgot to add the parmesan cheese, but it was still really good!
It certainly doesn't look much like the bloggers' pictures, but it really was quite tasty. Even reheated, the Pasta e Fagioli was very good. Although, as I stated before, it was more like a pasta with sauce rather than a soup with a bit of pasta in it. But, still very good re-heated. I'd highly recommend this recipe. Oh-so yummy!

Thanks for reading and, as the saying goes: when you're here, you're family.

Thursday, January 24, 2013

Cookie Dough Scoops = The Multi-Scooper-Tool!

I found this tip on Pinterest once, but for the life of me, I can't locate it now. That's the biggest problem with pinning so many things; you have so many things pinned, you forget where to look sometimes!

Anyway, this is a short, sweet and to the point blog. Here are some great tips for your cookie dough scoopers:

1)  Use it to scoop muffin mix or cupcake mix into cupcake liners!! I'm sure many of you already knew this, but this was a new idea to me. Such a simple solution and yet, I never thought of it!


2) If you are having a bunch of kids (or adults) over for a little party and you plan on serving ice cream, use your cookie dough scooper or ice cream scoop and scoop the ice cream into cupcake liners and put the pan with the ice cream back in the freezer. Now you have pre-scooped ice cream ready to go! No more I scream, you scream we all scream for ice cream; there won't be time for that with ice cream already being munched on before you get past the "I."

Who knew you could use your cookie dough scoop for scooping things other than cookie dough. Novel idea, I tell ya. I have to say, I do feel a bit ridiculous having not figured this one out on my own. It's a simple solution that I just hadn't thought of...hopefully somebody else will be in the same boat with me and will have never thought of it either. Anybody? Anybody at all?

Wednesday, January 23, 2013

Italian Chicken

Food is one of the easiest things to make on Pinterest. Especially because everybody needs to eat - so it doesn't actually take extra time out of my day to make it (since I'd be making something anyway)...it just takes extra gumption and a little bit of a daring mood to try something new. It's one of the reasons I'm writing this blog: to challenge myself daily to try something new. Last night was no exception. I made a new dish for dinner.

This recipe comes from http://aaronandjillw.blogspot.com/2011/08/italian-chicken.html and here are a couple of things you may want to know:

In the recipe, their blog says to cook the chicken until it's "almost done," and they do get asked for clarification in the comments, which they give (I have taken it upon myself to read the comments so you won't have to, unless you really want to): roughly about 40 minutes, give or take.

The recipe does not call for zucchini, but, again, someone in the comments said they were going to try that instead of the artichoke, and I love zucchini so I thought I'd just add that in along with the artichoke (a favorite of my husband's).

The blogger says they used artichoke hearts that were not marinated. The artichoke we had was marinated, and I believe it gave it a stronger artichoke flavor, which I'm not crazy about, so I'd just stick with them on that one and get yourself a jar or can of unmarinated artichoke hearts.

This is before adding the sugar and flour...it looks completely delicious already!
You can follow the recipe pretty much to the "t" and you will probably be pleased with it. The end result was something that looked pretty tasty as you can see, but it doesn't look anything like the dish aaronandjillw made. But, still tasty.


We made some pasta to to go with this dish and BAM we had a whole meal. My husband and I were not crazy about this dish and we were both trying to figure out what it was that we didn't like and we decided it was probably the cheese...it gave off a different consistency than what we liked. I generally like cheese in my food, but the consistency wasn't quite right. I think because there was plenty of liquid in the bottom of the dish from the tomatoes and the chicken, it made the cheese taste a little more...gooey? I'm not real sure. Either way, I may try to make this again, but I doubt I would put more than a sprinkling of cheese on it. 

So for now, I would not call this recipe a fail...but I would call it a "not quite perfected" dish. Maybe you should try it and let me know if you like it and what changes you made. The chicken and veggies in it were terrific, that much is for sure!

Trying a new recipe again tonight! Here's hoping for success...

Monday, January 21, 2013

Dry erase marker + washer/dryer = no more shrunken sweaters!

The title says it all, folks! I recently went on a surprise trip to Disneyland for my birthday. I know, I'm INCREDIBLY spoiled! Part of the gift of the trip (as if the trip wasn't enough by itself!) was my choice of any (1) article of clothing. Seeing as how I am a stay-at-home mommy, sweatshirts are my go-to clothing choice. Unfortunately, pretty much every time I've tried to find a sweatshirt at Disneyland, they always have a character on them and, outside of wearing them in the parks, I know I wouldn't honestly wear it much. So, I usually just get our traditional mouse ears (yes, we are that nerdy and, yes, I know we wouldn't wear those anywhere other than in the parks...probably) and longingly wish for a sweatshirt that is cute and not too...animated.  This trip clinched it for me! I found the perfect sweatshirt!

Cute, right? The sweatshirt, that is. 

Anyway, I was so very excited to find it! Unfortunately, the only size they had was a size smaller than I would normally buy or ones that would be quite a bit too big on me. I was pretty disappointed...for a moment. Until I decided "hey! I'll just NEVER dry it - it'll be a-ok!" So, we bought it! I've been incredibly nervous about washing it, thinking surely I would forget and it would end up in the dryer which, in turn, would mean my dear little 4-year-old niece would end up with my wonderful long-awaited, slightly expensive sweatshirt.

In steps Pinterest to save the day! Did you know that you can use a dry-erase marker on your washer/dryer to remind you not to put things in the dryer (or, for whatever else you may choose to write on there)? You probably did. But, I didn't...until Pinterest. YAY! There's no blog to this - it was just a picture. So, here's my picture as an example.


My fear was gone! I did keep my Disneyland sweatshirt out of the dryer and it is still the same, wonderful size it was when I bought it! YAY!! (By the way, my Wicked the Musical sweatshirt also stayed out of the dryer and will not experience anymore shrinkage, just in case you were wondering.)

The writing did wipe off of the dryer easily as well, however there was a slight green color on the dryer after wiping it off. You can just take a wet washcloth or some windex and it'll look as bright as ever. 

I will definitely be doing this again! What a life (er...sweatshirt) saver!

Sunday, January 20, 2013

Chocolate Molten Lava Cake: Slow Cooker Style

I love homemade desserts and I love my crock pot. So, when I found a recipe that combined both on Pinterest, so it was, of course, on my must-try list! 2.5 hours later and BAM it's done. 

The recipe I found came from http://en.paperblog.com/slow-cooker-recipes-chocolate-molten-lava-cake-85039/. It was incredibly easy to make and didn't take too long to prepare. And, really the wait wasn't too bad seeing as how a normal dessert takes that long when you consider preparation, baking and cooling time. 

As it was finishing up, it did not look so very appetizing or pretty and, in my opinion, smelled slightly burnt. However, my husband came home after it was done being made and he thought it smelled wonderful...maybe it was just the fact that it was being cooked on high for 2 to 2.5 hours and I was worried about burning it.  


After it was dished up and was paired with some ice cream, it really did look quite tasty though. 


My final consensus: I would not recommend eating this without ice cream. In fact, I may just recommend eating ice cream without this. It was definitely not my favorite. It was very fudgy, almost like pudding...with a few more cakey spots. My mom, my husband and myself all were in agreement; glad we tried it, happy to not try it again. But, it was worth a shot...just not a shot I want to take again. My son, however, did like it. That could just be because he loves anything that's sweet though. 

And to leave you on a positive: You may have also noticed my crockpot liner in the first picture. A friend of mine introduced me to them, and I haven't had to scrub my crock pot since. Incredible, I tell ya! They make clean-up so very easy, I'd recommend them to EVERYBODY. They look a lot like oven bags that you use for turkeys and such. Anyway, you should check them out - I highly recommend them. 

Friday, January 18, 2013

Bacon!

My last post was about making yummy stuffed breakfast biscuits and, in order to make that terrific dish, I needed bacon. Lots and lots of bacon.

The recipe called for a whole pack of bacon and, I don't know about you, but normally making bacon can be a difficult, greasy, skin burning from the grease kind of job. But, behold I have found a cure-all for these bacon problems! I actually pinned it a while ago from Martha Stewart, but found it again on another blog - http://theimprovkitchen.blogspot.com/2012/08/tip-how-to-cook-bacon-easy-way.html - and decided to go with that one instead...I thought they did a better job of explaining it all. Seriously, it wasn't that complicated, but I just appreciated their writing more, I guess.

Anyway, I didn't follow the recipe precisely...the directions say to put the cold bacon in the oven before it's pre-heated and turn it up to 400 degrees. I read another's review and they recommended setting the oven temp at 375 instead of 400 because the lower and slower the more fat renders out.  So, I went that route. One other thing the directions mentioned was to have the bacon "with a little breathing room between each strip." I majorly failed on that front, but my bacon still seemed to turn out alright!

Please forgive the fuzziness of the picture. I was in a hurry, apparently.

I took the bacon out after 20 minutes and realized that the other side really wasn't as cooked as I would like, so I put it back in for another 10 minutes and it was perfect. Now, for my sister, who loves extra crispy bacon, I'd probably try doing the 400 degree method as it would probably be a little more crispy and not quite so...saggy? But, this was just right for what I wanted.


No spills, no grease splatters and all the bacon done at the same time = delicious perfection!!

I had a friend on Pinterest recommend putting a cooling rack on the cookie sheet and then putting the bacon on that so the grease drips off. I think this is a magnificent idea and I'd highly recommend it as he already does this and says it works wonderfully. Unfortunately, I didn't have a cooling rack without rubber on it so I couldn't try that method. But, I hope to in the future and you should too! Oh dear...more reasons to eat bacon... like I needed that... ... ...


Thursday, January 17, 2013

Loaded Breakfast Biscuits

Of all the meals in the day, breakfast may be my favorite. My husband is not a breakfast fan and I'm not into starting my day with cooking a grand meal that only I (and possibly my son, when he feels like it) will eat. So, finding a make-ahead meal that is still hearty and doesn't take too long to prepare seemed like just the ticket!

I found this recipe at http://richestoragsbydori.blogspot.com/2012/03/stuffed-breakfast-bubble-biscuits.html. It looked so tasty. So, I gave it a try. 

I followed the recipe exactly as it was written in richestoragsbydori's blog and even bought the four pack of mini biscuits. What I ended up with a ridiculous amount of bacon and hashbrowns leftover, but everything else was just the right amount. 


I would've liked to have been able to stuff more ingredients into these bite-sized biscuits, but even with that complaint, you can see - they weren't lacking on stuffing. Maybe it's the glutton in me...

When I started making these, I tried laying out all the biscuits and then adding the ingredients. However, trying to pick them up and pinch them closed proved to be a bit of a challenge as the stuffing would all start to fall out as Miss Delicate and Graceful here would try to pick them up. It was quite the sight, watching me try and keep the innards...in. It seemed to work better when I made them each individually in my hand instead. The biscuits didn't start to burst on the bottom and I may have been able to fill them a little bit more since nothing was falling out as easily. 

Would I make this again? Most likely not, or at least not often. It really did take all morning to make them. I think it would be easier to make breakfast burritos. These are great as a special treat though. And, they really did taste delicious. I love the idea of putting different toppings on them, such as gravy or pico de gallo, or whatever floats your fancy. I'm happy, though, that I now have some great little loaded breakfast biscuits for my mornings when I want a little more oomph in my breakfast. I just pull 2 or 3 out of the freezer, nuke them in the microwave and have myself a mini-gourmet breakfast. 


In conclusion, as long as you don't mind taking a bit of time in the kitchen, these really are tasty little treats and they make quite a batch, as you can see. I hope you will try them for yourself, if for no other reason than the fact that you are trying something new. Sometimes that's all the excuse you need. Now, if you'll excuse me; they seem to be calling my name. Yum, yum!


Wednesday, January 16, 2013

DIY Orange Tealight Candle

I saw this idea on Pinterest a while ago and had a hard time believing that you could actually make a candle out of just an orange peel and some oil, so I had to give it a try. I can't imagine a time when I'd actually need to try this, so this was just for fun. The blog: http://www.intimateweddings.com/blog/diy-orange-candles/ posted about how such a novelty could be completed. 

I made it a little more difficult on myself the first go around and cut the orange totally in half and gutted it out like you would a grapefruit. That did not go as smoothly as I would've liked, but I got it done! 

I then filled the orange peel with oil and made sure the wick was saturated with the oil as well. 


And...drum roll please.... ... ... ...

It eventually lit... barely. 


The candle blazed with a flame for a grand 15 seconds...or less...but, it did light...after many, many, many tries.

But, being the tenacious girl that I am, I did not give up so easily. I decided to try peeling the orange with the method intimatewedding's blog called for, which was far easier to peel, actually. Then, I tried it again.

And, TA-DA! It lit! I had a candle!


The website boasted that you could have a candle that would burn for a few hours. I timed mine. It stayed lit for 30 minutes. Would it have stayed lit for longer if I had added more oil? Quite possibly, but I wouldn't put in the effort to add more oil every 30 minutes - that would get expensive, using olive oil!

Intimatewedding's blog suggested using these as center pieces at weddings or garden parties and the like. I can't imagine doing this as it still took multiple tries to get my orange candle lit and it only stayed lit for a half hour. This would be far too much work for a wedding, in my opinion.

I also expected that this would give off a nice citrusy aroma in my home, but it actually had no smell - which some people may like better. I think I'd pass on doing this again, other than for experimental purposes.

However, maybe you'd have better luck! If you try it and it works for you, I'd love to hear how you made it work.

Monday, January 14, 2013

DVD Cleaning: Scratches

I love second-hand stores. Especially with a little one. I love to get him gifts. Things to help him learn, things to keep him warm, things to keep me sane...like the occasional DVD (gasp!).

My son really likes the Baby Einstein movies and I highly recommend them if you let your toddlers watch TV. They are very mild and move slowly, they are educational, they have very little talking and when there is, it is gentle and tender...definitely not over-stimulating. I really enjoy them, uh...I mean, my son really enjoys them. Ok, we both do... Anyway, enough advertising for Baby Einstein. 

The other day I went to the second-hand store and you can imagine my excitement when I saw a whole shelf full of Baby Einstein's on sale! And they were cheap! I didn't go too crazy...I only bought half a dozen instead of the whole dozen. But, alas, one of the DVDs had some sticky goopy stuff on it. I'm not sure what it was, but it was not coming off and my DVD player wouldn't recognize it as a DVD! And, because it was from a used-stuff store, I couldn't return it. 


Frustration began to set in. 

In steps Pinterest to save the day! I searched on Pinterest and found this fantastic blog http://thehandmadedress.blogspot.com/2008/09/do-you-suffer-from-scrached-dvds_27.html that gave me step by step instructions. 

It called for children's toothpaste, and thankfully I had two different kinds to try. I tried using my toddler's kind, but found that maybe it was too gentle?? I'm not sure. Either way, it didn't seem to work as well as my child's Spongebob toothpaste. (Side note: this is not me advocating Spongebob. As a matter of fact, I am NOT a fan...but, it's what we had somehow...)


Anyway, much to my dismay, it just didn't seem to be working...I gave up...and then decided to read her blog about this one more time before trying to find a different method. She says for a REALLY scratched up DVD, you may have to do it twice. Well, I had...but, I tried twice more...rubbing it for at least 20-30 seconds each time. I rinsed it, patted it dry and tried it in my DVD player one more time...

IT WORKED! It doesn't look like a very pretty disc, but you can see that all the big scuffs and bumps are mostly out and, either way, it worked! I definitely had to use some elbow grease, but it was worth it. 

In conclusion, I would recommend you check out thehandmadedress's blog and try it for yourself with one of your hopeless CD/DVDs/Wii Games. What have you got to lose? Excuse me now, while I go cuddle my toddler and watch some Baby Einstein...


Thursday, January 10, 2013

Easy shower caddy holder

I found on Pinterest this wonderful idea of hanging a shower caddy on the opposite side of the shower with a coat hook so it doesn't interfere with the faucet. I thought this was a great idea. Not because we've had problems with the caddies interfering with the faucet, but because I've tried shower caddies multiple times, but the "neck" of our shower head doesn't accommodate shower caddies; it's just too wide.

So, I wanted to give this a try! However, I am power tools illiterate and didn't want to screw anything into my bathroom without my husband's help...and...unfortunately, I am impatient and didn't want to  wait. So, I didn't. I improvised. And, I'm still quite impressed with myself for it.

I used one of those stick-on hooks. We have used them for our RV to hang coats and such, and they can take quite a bit of weight - plus, I did get one that could hold heavier weights - like a seriously weighted down shower caddy. I mean, seriously, who doesn't need a shampoo bottle the size of texas for a family of 3??

Anyway, I hung up the power-tool-free hook and waited the LONG hour (I told you I'm impatient!) that I had to wait before I put any weight on it. Then, I hung my shower caddy, decided what I wanted on it and looked on with pride at the work I had done...beautiful.


(Ok...moment of truth: my shower caddy is actually far fuller than this normally, but I wanted to make it look more aesthetically pleasing for the picture...and I'm not regretting that choice at all. It looks good!)

I've had it hanging now for over a month and it has served me well, never wavering in its ability to hold onto my shower caddy and the items it holds. I am quite pleased.

Side note: did you notice that scrub brush on my shower caddy? That is how I clean my shower - another Pinterest Test that has proven to work! But, that's for a later post...

Editor's note: The exact make of the hook I used was the "iDesign adhesive!" Attached is a picture so  you know what to look for.


Tuesday, January 8, 2013

The first Pinterest Test (blogged) fail

I know I've said it before, but I'll say it again (and probably again and again), I love to do projects with my kids. So, we attempted to do a fun little project. I found it on Pinterest with the title "glue and acrylic paint batik," I followed the link to http://ourcreativeday.blogspot.com/2011/08/rainbow-batik.html  and thought it looked easy enough! So, we gave it a try.

Unfortunately, I didn't have any batik and the store that I went out to get some at didn't even know what I was talking about.

Editor's Note: Apparently the project itself is called batik. But, the canvas-like fabric doesn't work for this so well...I've heard cotton may work better...ALSO - it is pronounced bateek, unlike the way I was saying it - batik... :) I stand corrected and humbled. Anyway, back to it:

So, I got some bandanas that are made out of some kind of canvas, I think. That was probably the first error.

I let the kids choose their paint colors - probably the second error as we ended up with an ugly brown and a neon orange with the rest being sparkles and a few primary colors...the pallet was certainly...unique.

We started by drawing designs with Elmer's gel glue. I mention this specifically because the last time we tried this, we didn't have the gel glue so we used the normal white glue and it worked even less than this attempt. Yes...this was our 2nd attempt...

Moving on...

After the glue dried, we went to work with painting.


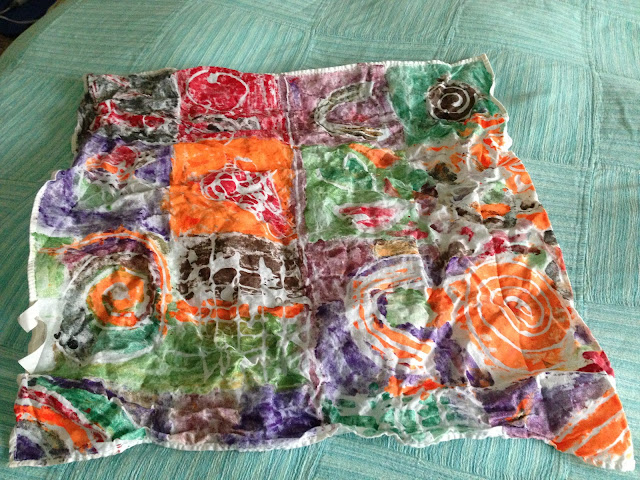
 And, here is the painted masterpiece.

After the paint dried, we let the little ones play with it in a sink full of water, since they enjoy doing that anyway, it worked out quite nicely.


What ourcreativeday's blog says is to just let it soak in hot water for 15-20 minutes and voila! It's not supposed to upset the paint if you do rub a little bit, but that wasn't so much the case for us. Some of the paint came off as well as the glue. Bummer!

The other thing was, once it was completely dry it was...crunchy. I'm not quite sure what to do with a crunchy bandana, but I thought maybe washing it in the washing machine might help...nope...that didn't work either and it left a little bit of paint bits in the dryer that (thankfully) came off fairly easily.

Here is our creative "masterpiece," just the same, for your viewing pleasure:


I'm certain that if we used batik, we would've been golden...I may have to try that next time. But, if you do attempt to do this little project, be prepared to spend a lot of time waiting - so if you are doing it with kids other than your own, you might want to plan on having them overnight or for a few days. It is way fun just to paint and scribble and have fun with the kidlets anyway - even if it doesn't come out exactly how you were hoping...or how the picture showed that it might... :) Next time though, I may just do it myself and pick colors that I like...and use batik.

I'm thinking if we can ever get it right, it'd be fun to use it for a cover of a blanket or something unique like that. 

We will be attempting this again sometime, to see if we can master it and I'm looking forward to the challenge! 


Monday, January 7, 2013

Tex-Mex Style Macaroni & Cheese

Just another meatless Monday! Or...something like that. My husband and I have made it our goal to go meatless on Mondays. It's certainly a challenge, being the carnivore that I am. But, it's been a good challenge, as I have tried things I probably wouldn't have tried before. Like, Tex-Mex Style Macaroni & Cheese.

This dish comes from http://skinnyms.com/tex-mex-stylemacaroni-cheese/ and is quite tasty, indeed! The recipe calls for cheddar cheese, but we only had colby-jack cheese on hand, so that's what we used instead.

My husband actually made this dinner for us tonight as I was laid up on the couch feeling pretty awful. It may not look super tasty in the pictures, but it is really yummy.


This was actually the second time we have made this dish and I would give it a hearty 2 thumbs up. It does have a bit of a kick, so if you have a very sensitive stomach, it may not be the best choice. But, my husband, my son and myself all really liked it. Definitely worth a try!

Saturday, January 5, 2013

Clean Your Pillows!


I did it! I cleaned my pillows. I was always pretty weary about doing so because I didn't want to ruin my perfectly wonderful feather pillow. It was during the summer, and I don't have the pictures to prove it - but my feather pillow came out fluffier and puffier than ever and I'm pretty sure I've been sleeping better since I've washed it.

I then went on a mission and washed every pillow in my house. Including my Boppy pillow. I found out how to wash and dry my pillows from http://cleanmyspace.com/clean-your-pillows/ which, of course, I found through Pinterest.

It really wasn't hard to do. You will need to have a couple of tennis balls inside tube socks for the dryer so that the fluff inside the pillows doesn't bunch too much.

Here are some of the before and after pillow cleaning pictures:

Before washing
After washing
Before washing - notice how un-fluffified the Boppy is!
After washing - look at the glory of the fluffiness of the two pillows!
It took one run through the washing machine, 1-2 runs through the dryer and the pillows were as good as new. I did, however, have a lovely smelling fabric softener in my dryer that was semi-permanently in there - that gave my pillows a stronger smell than I would've liked. This time around, the fabric softener was not in there, and I'm happier about that. So, I personally, would not recommend fabric softener or strong-smelling detergent. But, seriously, use what you have. The smell didn't last that long.

I'd highly recommend washing your pillows at least every 3-6 months. It's nice to get them rejuvenated and fluffy again! Don't be afraid to wash your pillows, like I was. The results are terrific.

Friday, January 4, 2013

Fizziness! Entertaining and educating young minds...

I've had my hands full the last few days. I've been watching my two nephews (ages 2 & 8) and my niece (age 4) and my own son (age 1.5). It has been a real treat for me! The draw back? They are used to coming to my house and doing projects - it's what we do. I love to do crafts and activities with the little ones. It keeps them entertained and their little minds growing. Today was the last day of watching them this week and I was drained - so we did a little science experiment I found on Pinterest. It didn't have a specific blog like a lot of other posts I go through did, but you can find it at: http://indulgy.com/post/yEzmaJ9sE1/drop-vinegar-tinted-with-food-coloring-onto-a-pa

And, if you were to just type in "food coloring vinegar baking soda" in a Pinterest search, it would give you all kinds of ideas and basically the general format. 

Normally, projects with the little ones is a highlight for me - but with two toddlers running around, crafting time with the two older ones can be challenging. This project was great because all 4 of the kids could enjoy it. 

All I had to do was mix some food coloring in with some white vinegar and put some baking soda on a platter. I used an old, cleaned out medicine dropper and squirted the food colored vinegar onto the baking soda and enjoyed watching the kids' amazement as our own little science experiment took place.  The baking soda fizzed as soon as the vinegar hit it and the colors spread - it was pretty neat to look at. 


The colors weren't as vibrant as what I had seen on Pinterest, but it was a nice color combination, just the same. The kids all took turns squeezing the vinegar out of the dropper and onto the baking soda, which was a nice little bonus for the two younger ones as it helped work on their fine motor skills too! The two older kids enjoyed mixing the colors later to get different color combinations. It took quite a while for the fizziness and the excitement to go away, but here's what it looked like as the liquid was just starting to dominate the baking soda.

 Not very pretty, no. But was it entertaining? Absolutely! My nephew and my son, who have the attention span of grasshoppers, both enjoyed this activity for nearly a half hour while my niece and my older nephew enjoyed it for another half hour when the little ones were done. It continued to fizzle until everyone was done playing. Quite entertaining, enjoyable and a good way to keep them busy for a while. I'd recommend it. 

I did see some other idea on Pinterest of things to do for this experiment - like using a spoon instead of just a medicine dropper, putting the baking soda in cups and adding a little vinegar - that's what I want to try next! That looked like a little bit of volcano-action! Anyway, I'd recommend checking out some ideas on Pinterest, but just know that this little experiment is a hit! No matter how you accomplish it.  At least it was at my house. 


And just so we don't end on the ugliness that is the "science experiment" picture, here is a picture of what my nephew and my son (the half naked one) did after they finished with the experiment. You'll never hear me say toddlers are too young to do the dishes... :)