Wednesday, April 30, 2014

Protein-Packed Peanut Butter Cups

What to make for dessert with friends? That was the question of the hour the other day as I prepared for an evening of fun with some dear friends. These friends (Jordan and Haley) are awesome and gracious and I figure if I was going to try something new, they'd be good friends to try it with, because they would be honest but not too disappointed if it was a total flop. (Or at least not show too much of their disappointment.) So, I tried out two new recipes. One was this recipe for healthy peanut butter cups.


These were very easy to make but they melt very fast if not kept in the fridge of freezer. I used my awesome Blendtec blender to mix these up really well.


And here's what it looked like after it was all mixed. 


From here, I poured the mixture into mini cupcake liners (I got them at Craft Warehouse on a whim). I liked using those way better than a full size cupcake liner because I was able to make more and I felt like these were rich enough that one mini was just the perfect little bite.


My little boy (the nudist) wanted to help make these and, although that would not work in a commercial kitchen and some people may not appreciate it, I knew my friends wouldn't mind. They have 4 boys. They get it. ;)


I didn't get a picture of them solid. But, they looked pretty much the same. Just solid. HA! My friend, Haley, said she was a little disappointed that there was no visible peanut butter in the middle...false advertising on my part. We've come to expect the peanut-buttery middle out of our peanut butter cups...and for some reason, I think that would've made them taste better. Once she got past her momentary disappointment, she said she liked them and would like them for an afternoon snack with a cup of coffee. They are a nice little pick-me-up.

I may be a little biased to the totally unhealthy, totally unnatural Reeses Peanut Butter Cups, so this more natural, more healthy option wasn't quite my cup of tea. But, they weren't bad. I'm going to try another recipe using honey instead of stevia next time and see if I like it better. But, for now, I'd say these are pretty good, as long as you know what to expect. They were worth a try and a decent success, I'd say.

Thursday, April 24, 2014

Grilled Chicken & Pineapple Quesadilla

Sometimes the gloomy weather gets you down and you just want a taste of paradise or what I can only assume paradise would taste like. Grilled Chicken & Pineapple Quesadilla for the win!

Photo from Pinterest
These are fairly simple to make and very tasty. I didn't have any monterey jack cheese, so I used a combination of colby jack and mozzarella. I have made this once before, but I used monterey jack cheese, and both my husband and I liked it better this time. I'm assuming it's because of the cheese - but I'm not certain.

I already had cut up pineapple into bits, so I didn't put them on a skewer - just flipped them with a spatula on the grill.


Grilled pineapple is so tasty. Just look at the golden brown color they were turning and, by the way, it smells lovely as well.

After the pineapple was grilled, I put it to the side and grilled the chicken. I seasoned my chicken with salt and pepper. They didn't seem to need anything else...well, at least not once the BBQ sauce was on them.


After it had grilled for a while, I added a honey BBQ sauce to the meat. You can almost smell the goodness from this picture. Oh yum.


I didn't have any cilantro, but it wasn't necessary and it didn't seem to effect the flavor too much. I warmed up my tortillas and then layered the ingredients as described in the link above. This meal was filling, delicious, satisfying and brought a little bit of summer to our table. I'd highly recommend this yummy twist on a classic quesadilla.


Tuesday, April 22, 2014

Paleo Shamrock Chocolate Shake

So...St. Patty's Day is over. Like, a month ago nearly to the day. But, I just tried to make myself a shamrock shake. Why not? I am not confined to the calendar and neither is my blog. Unless you just read my hardboiled egg post where I waited an entire year to post about it so that it would be near Easter. But, either way, I'm still not gonna let the calendar confine me with this Paleo Shamrock Shake!


I decided to do a little twist to this recipe and added in chocolate chips. However, I added chocolate chips that are dairy, soy and nut free (called Enjoy Life Chocolate Chips) so that this would stay a paleo recipe. 

Yum, yum! 
 My son (who generally loves smoothies) didn't care for it and I had both my mom and husband taste it without knowing what it was. Neither of them really cared for it. My mom, after she tasted it, said "Hmmm...grass...and...mint...and...chocolate??" Ok...that doesn't sound very good. And, honestly, after she said that, I understood. It wasn't super great. It wasn't bad but it did taste very...green. I drank the whole thing anyway, because it was healthy and didn't taste awful. 

The color was not very shamrock-y either, probably because of all of the chocolate chips I added. But, that's ok. I think the chocolate helped. :)


Anyway, there you have it. A yummy-ish chocolate and mint shake and paleo! Woohoo! Happy post St. Patty's Day!

Sunday, April 20, 2014

Resurrection Rolls

Why do we celebrate Easter? This is a question I have been asking my son and my niece and nephews. I want them to know the reason for the celebration: Jesus resurrection from death! This is no "zombie Jesus" I serve. Jesus is a very real, very alive, very conquering King of All! I want to be sure that my kids know the reason we celebrate Easter isn't about the Easter bunny and the candy and the egg hunts, but about our Savior, Jesus Christ. So, I found this great idea on Pinterest to teach them about Christ while also letting them enjoy some crafting and fun. Resurrection Rolls

Photo from Pinterest
There were a few different blogs I discovered on Pinterest, but I really liked the specific blog linked above that gave scripture to read at certain points of the baking/preparation process. 

We started by reading John 19. My nephew has been reading up a storm and was very excited to do the reading for us, so I had him read a bit and then I finished off the chapter.

 
The two younger littles quickly got distracted and a little bored, but after we read the normal Bible, I read the same story in a kids' Bible and that held their attention a little better. After we read the story, we prepared the marshmallow (symbolizing Jesus) and buried it in the crescent rolls (symbolizing the tomb). All of the kids were able to help with rolling the marshmallows in the butter, cinnamon and sugar, but I had to help them, so I was only able to get a picture of the older two preparing them.


After all of the rolls were prepared, we stuck them in the oven and read another passage - the story of Jesus RESURRECTION in John 20:1-18. We did a lot of explaining during that time so that the little ones would understand a little better the amazing, awesome sacrifice that Jesus went through for us and the absolutely thrilling, incredible miracle it was that He came back to life! 

When the rolls were all done, I pulled them out of the oven and noticed the "Jesus" mallows seemed to ooze out a bit, but "he" was gone from the inside of the roll, which is what the goal was, so it still worked out. ;)


We waited about 5 minutes for the rolls to cool. The kids were very excited to eat them, so they tried to rush the process by cooling them down on their own.


Once they got to dig in, they saw for themselves that Jesus had, indeed, rose and was no longer in the tomb. They each wanted me to take a picture of them making the discovery, so here they are.


My oldest nephew, Gabriel, added a couple of ideas of things that were being represented as we worked on rolls. Very creative thinking for my little guy, so I thought I'd share. 


1) When we were opening the package of crescent rolls, we hit them on the counter to open them - Gabe said he thought that should represent the abuse and beating that Jesus received.

2) While the rolls were in the hot oven, Gabe said that should represent Hell. Jesus went to Hell and back for us - literally. So the hot oven seemed like a good representation of that. 

I feel like he had one or two more other ideas of things that were being represented, but I don't remember what they were now. Either way, it may have been morbid - but I was proud of him for finding more representations for what had happened to Jesus.


The rolls were incredible. They tasted a bit like small cinnamon rolls - maybe even just the middle of a really tasty cinnamon roll. They were very tasty. A Bible Story and a tasty treat at the end; that is my kind of lesson. :)


Today, when Cade woke up, we told him it was Easter and asked him if he knew what it meant. He got the gist...kind of. He told us "Jesus died and was a marshmallow and we rolled it [in cinnamon and sugar] ..." and then we prodded "and then????" He didn't have much of an answer beyond that. So, we had the opportunity to, again, tell him that our precious Lord and Savior rose again - conquering death for all eternity for any who would accept and believe! A metaphorical story using marshmallows for a 3-year-old may be a bit much to grasp, but he retained most of it, so I think we will make this an ongoing tradition. It blesses my heart to tell my kids this story and have them begin to understand and get it. 

Happy Easter, my friends. He is risen! He is risen, indeed! May God bless you richly.


Thursday, April 17, 2014

Hardboiled Eggs

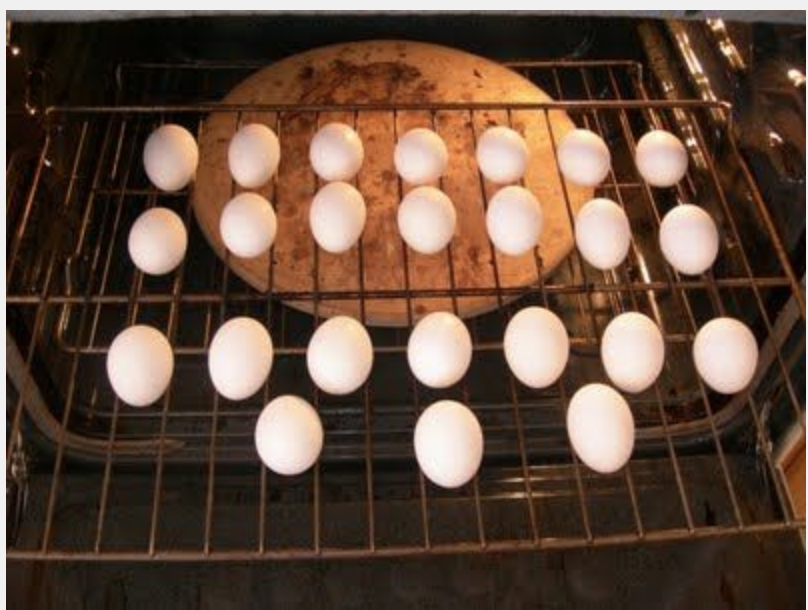
A friend of mine requested (a year ago around Easter) that I do a blog post about a Pinterest test on hardboiled eggs in the oven.
Photo from Pinterest
So, I gave it a shot, but I never posted about it because I couldn't get it done before Easter. Thankfully, I'm getting to it (barely) before this Easter. ;)

I started out with my eggs in the oven and then I remembered to put a baking sheet underneath of them, thankfully. The blog post linked above says that you should put the baking sheet underneath in case any of your egg shells break.


Some of the egg shells did, in fact, break. This was a tad messier than I expected it to be. As you can see from the baking sheet, a little more than just the shell came off of a few of them, and some of them lost a big chunk of their shell.


Still, it worked out. The eggs didn't look all that pretty, but they tasted just as good as if they had been boiled. For some reason, they all ended up with a little brown spot on them, and I'm not sure why. As far as being aesthetically pleasing, I think these are definitely better for just eating. You won't be able to color these eggs. But, if you are looking for a way to make a bunch of hardboiled eggs at the same time, this seems like a good option....as long as you don't care if they are pretty at the end.

Hope this was helpful for someone. Sorry for the shortness of this post. It was so long ago, I had to recall the results and don't feel like I can give quite the rundown that I would've liked for this. But, it's done! My post has been completed. :)


Monday, April 14, 2014

Milkies Milk-Saver

WARNING: THIS POST IS BEST TO AVOID UNLESS YOU ARE OR WILL BE A BREASTFEEDING MAMA! SERIOUSLY, YOU WILL BE SUBJECT TO TMI IF YOU PROCEED!!!

Ok, now that that's out of the way...I saw a pin on Pinterest before I was pregnant with my daughter for Milkies Milk-Saver. I pinned it and hoped that I would remember it later when I had my little one. Thankfully, I did! 

This is a semi-Pinterest test, and a bit of a product review. Because I was interested in it after seeing it on Pinterest, it makes this a Pinterest test. And, because I didn't understand it much, I thought I'd tell you a little about it just in case you might be interested in knowing as well...


Based on this picture, I imagined this would be something that was kind of like taped on to your breast and a bit of a challenge to get off - but it really wasn't too bad at all. Here is what it looks like off of a person.


So, it's a hard piece of plastic that you stick in your bra while you are nursing on the other side and when your milk lets down, this will catch what is coming out on the non-nursing side. It comes with that little egg-shaped carrying case, though I'm not sure the point of it (past using it to hold the milk-saver upright), since you will want to store the milk right away. 

Anyway, it's easy to put on and take off (especially if you have an underwire-free bra on), totally pain free and really does catch the liquid gold. 


To give you an idea of how much milk that actually is, that filled up to 1.5 ounces in a bag. It's not a lot, but it's kinda nice to know that I didn't have to do anything but put it on.

If you have a nice amount of letdown, this is good thing to use. If you don't, it's not worth the price.  I, thankfully, was able to get it for a very cheap price thanks to a website called www.steals.com. Steals.com has deals twice a day (8am and 8pm), things for babies, mamas, crafting and kids. It's definitely worth checking out. In all honestly, I've only used the Milk-Saver once. It was really cool, but for me, it's easier to not use it, because I rarely nurse in the same spot, and I don't wanna go looking for it every time. However, if you have a designated nursing spot - this could be a really neat way to save some of your milk.

So, there you have it. My review of the Milkies Milk-Saver. Linked above, is the product on Amazon. It's cheaper to buy through Amazon then through the website directly. And, for a little bit of added humor, here you go. You know what I'm talkin' about, mamas. :)

Tuesday, April 8, 2014

Soy and Dairy Free Banana Oatmeal Chocolate Chip Muffins

I had to make breakfast for my recent MOPS meeting and I was at a loss. What should I make that I could eat (given my dietary restrictions due to nursing my daughter and my daughter's dietary needs)?  As usual, Pinterest to the rescue as I gave these Banana Oatmeal Chocolate Chip Muffins a go.

Photo from Pinterest
One of the setbacks that I discovered was that chocolate chips have soy in them. NO! I really like chocolate chips. Thankfully, I discovered dairy and soy free chocolate chips. (By the way, this may be only funny to me, but my brain was working faster than my fingers and instead of typing dairy and soy - I typed "doy." hahahahaha! Not that funny?? Ok...moving on....)

Here's what they look like - you can click on the text above to buy some from Amazon.
So, I used my "Enjoy Life" dairy, nut & soy free chocolate chips (which taste remarkably like normal chocolate chips), and called it good. I did not have any almond milk, so I used coconut milk - and that seemed to work just fine. I did not use cupcake liners, although that probably would've been easier, but the pan was actually rather easy to clean. Having stoneware probably helped with that too. I was able to make just 12 muffins without any extra batter.


After baking them, I took them to MOPS (still in the stoneware so they'd have time to cool) and my lovely friend who is in charge of hospitality for MOPS, put them on a platter for me - and took a picture. So, here it is: my baked soy and dairy free banana oatmeal chocolate chip muffins.


I enjoyed the flavor and the texture of these. I probably would use a few less chocolate chips next time because it tasted rather rich to me, but it was still very good. This has not been kid-tested, but I have a feeling that my kid would've liked it (any time chocolate chips are involved, he's pretty much on board...like mother like son.) I, unfortunately, didn't ask for feedback from anybody at MOPS, but I'll give you my two cents: they weren't too bad and I think I will make them again. Maybe I'll make them with blueberries next time! Although, chocolate is always a good choice...doy! ;)


Thursday, April 3, 2014

Baked Corn Chips

My husband has been on a guacamole kick recently. And, thankfully, he makes some pretty tasty guacamole. However, we ran out of tortilla chips the other day (the horror!!), so I improvised with a test I've been wanting to try for a very long time: making tortilla chips out of corn tortillas!

Photo from Pinterest
We bought a big bunch of produce from Bountiful Baskets recently, and purchased the guacamole and salsa package that went along with it. In that pack came pre-cut corn tortillas, so my job was easier than some because I didn't even have to cut them.


I put them on my baking tray - I love my stoneware - and then sprayed them with olive oil and sprinkled with salt. From there, I put it in the oven.


Having not read cindyriddle's blog very carefully, I didn't follow the directions as closely as I probably should have. My first batch of tortilla chips came out very limp, chewy and kind of stale-tasting.


I discovered the reasons behind this, though. There were two reasons:
1) I didn't let them cook long enough. Cindy's blog says cook time can vary, but you should let it bake until they are golden brown. As you can see, mine weren't.

2) Make sure they are not layered at all. The problem I have with this is how few chips you end up making at a time, but it's worth it.

The second batch I made was far tastier than the first. However, I think I may try one more time, baking even longer because they weren't all as crisp as I would've liked.

This was a fun experiment, and I'm looking forward to trying it with my husband's next batch of guacamole...pending we have the *real* bagged tortilla chips readily on hand in case these still don't turn out as we would've hoped.