Friday, June 28, 2013

Cheap and Easy Stamped Coasters

It's been a while since I've posted about something crafty that isn't concerning the upcoming arrival of my baby girl. It's also been a while since I've posted about something regarding cleaning. But, because I don't feel like cleaning at the moment - crafting wins. YAY!

I found this lovely, elegant-looking coaster idea on Pinterest last year and I gave it a try - it is just as easy as the blog suggests! To check out the blog that gives you more specific instructions, go here. And while you are there, you may want to explore the blog more - there are some great ideas on there! Lots of fun stuff. I'm looking forward to looking at it further.

Photo from Pinterest

Aren't these so pretty?? I made some for my mom recently and they were a hit. To get all the supplies to make these, I think I spent under $15 - stamps, ink, corking for the back of the coasters, tiles & and paste finishing wax all included in that. And, I had more tiles than the set of four I was planning to make for my mom, so I was able to make two sets for that price! This is a great idea for an inexpensive, nice gift for someone you care about...or someone you don't...I'm not judging you.

Anyway, this was such a simple project and all of the pictures on how to make it are already in the blog linked above, so I'll just show you the end result I ended up with.


I actually couldn't find the pictures of the coasters I made for my mom, but these are some that I made for a friend of mine. The only thing you need to be careful of is that you make sure your ink is all even on the stamp - otherwise you end up with a bold letter (or whatever design you are using) and others that are more...muted. I bought the stamps that are called "cling stamps" - so they stick to acrylic blocks and can be changed out easily. I did have to get an acrylic block too, but that was also very cheap and having tried it both ways (with and without the acrylic block) - I'd highly recommend getting the acrylic block and buying the cling stamps. They come in a nice variety pack for very little cost. I was able to get the whole alphabet in my set. WOOHOO!

Anyway, those are my little tips for this project. This is such a fun one to make. And to all my lovely friends out there: If you do end up receiving these as a gift from me sometime - don't think it's because it was inexpensive and easy to make - it's because I think you are a class act and deserve something classy, also homemade is always better than store-bought! Plus...inexpensive & easy to make are an added bonus. :)

Happy crafting!

Wednesday, June 26, 2013

Roasted Garlic, Chicken & White Herb Pizza

Pizza. Who doesn't love a good pizza? I do. Hawaiian is generally my favorite. Although, a good meat and tomato pizza makes me pretty happy too. Howeverl, I'm fairly certain food makes me happy. Oh, how I love to eat. Anyway, back to pizza. I made homemade pizza the other night, and I think it turned out really tasty! To see the recipe, check out the link here.

Photo from Pinterest

I made my own crust thanks to my Betty Crocker cookbook. I don't know that there is a better crust than that one, honestly. It's easy to make and quick - I'd highly recommend it. I also roasted my own garlic which I had never done! I feel so domestic. Go me! I'll post about my results and how I made my own roasted garlic sometime soon, but for now I'm gonna focus on the pizza. While my garlic was roasting, I took a boneless, skinless chicken breast and boiled it for 20 minutes and then shred it. 

After I minced my garlic, I went about following the recipe. I didn't have any skim milk or half and half, so I used what I did have: 1% milk. It worked wonderfully. And, because I didn't use half and half, it may actually have been a bit healthier - but I'm not really sure. Anyway, it worked out wonderfully for us and still tasted terrific. 

Mmmm...garlic and butter...boy, did my house smell.

After the milk was added and had started to thicken
After I had my sauce, cheeses, onions and chicken all prepared I began to put all the yumminess on the crust (which, honestly, was double the size of what a regular crust should've been because I made too much and didn't want to throw it out...but Sicilian Pan Crust-ish crust is good, right??)

I forgot to take a picture after I had all the toppings applied until after I had it in the oven, but better late than never, I suppose. 


It was already starting to get gooey from the cheese. Oh, yum! After I pulled it out of the oven, I used the dried herbs that I had (unfortunately, I didn't have any fresh herbs on hand as the recipe recommends) and the masterpiece was complete. 


Add a little bit of salad on the side and this dinner was delicious!! I'm not a fan of onions, and honestly not a huge fan of garlic either, but this combination was really tasty. My husband and my son both really liked it as well...although my husband did say with a slightly thinner crust it may be a little better. We had A BUNCH of leftover pizza that we shared with some friends down the street and still had some for lunch the next day. By the way, it reheats quite nicely as well. Yeah...this was definitely a good recipe!

I'd recommend making this for sure. Although, make sure you allow yourself about an hour or so to make it. It's not all busy work the whole time, and it probably wouldn't take that long if you don't make your own crust, but it does take some work. I will make it again. It was definitely worth it. Oh so good!


Monday, June 24, 2013

DIY Ironman Mask

I was planning on posting this around October near the dressing-up festivities, but with the recent release of Iron Man, I thought it'd be an ok time to post it. What kid needs an excuse to dress-up in awesome costumes anyway, right?

Last Halloween, my nephew was looking forward to being IronMan and receiving loads and loads of candy. He had the costume; he was set! However, much to his dismay, his IronMan mask had gone missing! What a travesty! Thankfully, we found a way to make our own mask with a template found through Pinterest. To check it out, go here.

Photo from Pinterest
Granted, this was not a fancy-schmancy plastic mask that came with the costume, but it was pretty cool to make one at home.

A couple of things you'll want to know though:
1) you will need a printer to make this;
2) the template is already in color, so if you print it in black and white, it'll just be different tones of grey, black and white, which can still be colored in, but it won't be quite as colorful...although kids coloring things is ALWAYS more fun than watching someone print & cut a mask...so, there's that;
3) I used normal printer paper, I think to get this to work out the best, you should use a slightly heavier paper than normal printer paper. Ours still worked wonderfully, but that's just my own observation.


So, I'd count this as a success - Gabe loved wearing his mask and had a great time with it. Did he actually wear it on Halloween? No, I don't think he did. But, the enjoyment he received just from the time he did play with it makes me happy. Plus, it calmed the devastation of the situation. So, yeah, definitely a success.

Thursday, June 20, 2013

How To Make Tutus

A few days ago, I posted about our little bundle of joy coming in October and what the sex of said child would be. If you missed that blog, you can check it out here. In that blog, I mentioned that I actually did a double-whammy gender reveal; I just saw too many good ideas that I just had to use! This is a post about our other picture gender reveal that we did.

I decided it would be fun to stick with the shirt theme like we did when we announced we were having another baby. So, this time, I made my son a shirt that said "Big Brother." And I made baby a shirt as well. Well, I didn't make the shirts, I made the designs on the shirts using my awesome silhouette cameo machine.


I decided that just having the little onesie for baby girl didn't seem girlie enough. ha! So, I decided to make a tutu. I was originally going to buy one, but thought that was a rather large waste of money when I could easily make a simple one and later on spoil our baby with tutus when she's here. This was so very easy to make! I searched on Pinterest for directions and of course found what I was looking for.  To see how to make them for yourself (in pretty much any size you choose), check it out here.

Photo from Pinterest

I cheated a bit and didn't follow the directions to a "t" as baby girl probably won't actually be wearing this cute little tutu. But, the directions were so simple! I plan on making some for her at some point. Seriously...so easy! 

I didn't need so much elastic that I could wrap it around a chair as suggested in makeit-loveit's blog, so it was probably a little more challenging than it need it to be for me as I just worked with a loosey-goosy elastic band and tied the tulle around it. 


After I did a bunch of knots of tulle, I pinned the back of the elastic (since little one wouldn't actually be wearing this one) and went on my merry way. It was that easy! Granted, it would certainly be just as easy to sew the elastic together I am certain. The blogger also says you could just tie it around the back which could also be very simple. Either way, this was extremely simple to make and I can't wait to try to make more. Seriously, the ease of this blew me away - 15 minutes and my creation was complete!


Monday, June 17, 2013

Lasagna Soup

The other morning, I got some hamburger out of the freezer to thaw for dinner and then realized I had no idea what to make! What a conundrum. I didn't want to try anything I hadn't tried before; I didn't feel like my tummy could take that. So, I went to my "Tried & True - FOOD" board on Pinterest. And, lo & behold, there was a recipe on there that I haven't made in quite a while: lasagna soup!

Photo from Pinterest

Obviously, since it was on my Tried & True board, I have made it before, but I've never blogged about it and here we are! What a great opportunity to make something that I enjoyed and continue to attempt to reach my blogging goal at the same time!

If you are a fan of lasagna but not a fan of the amount of time it takes to make, this recipe is superb! It's easy, quick (well...quicker than making real lasagna), tastes delicious and the leftovers are also wonderful!

I altered the recipe ever-so slightly to accommodate what I already had in my cupboard (i.e., I did not use the noodles afarmgirldabbles recommended, but rather used an assortment of what I had on hand). I also changed the recipe when it came to the ricotta cheese. I was not confident about using ricotta cheese as I've always made my lasagna with cottage cheese - so that's what I did instead - I altered the recipe and in place of the ricotta cheese, I used cottage cheese. Most people may favor the ricotta cheese, as that seems to be something more common in lasagna, but I've never been a huge fan, so my cheese choice pleased me. :)

 It all came together rather quickly, and while the soup part of the meal was simmering, I made the pasta and prepared the cheese combos. In afarmgirldabbles' blog, she offers the options of making the pasta separate (especially if you aren't going to be eating it all in my setting) or cooking it in the soup. As you may remember from a previous post, back when I had my homemade Olive Garden dinner night and made Pasta e Fagioli, I had not cooked my noodles separately and it didn't turn out quite as nicely as I would've liked. I didn't make the same mistake this time! The noodles were perfect after being prepared and then sitting for a minute or two without water and then being put into the soup. The consistency of the noodles never did change once they were combined! I'd call that a success!

After everything was put together, we had a wonderful dinner. I put the cheese combination in the bottom of my bowl and the soup/pasta combo on top and then mixed it all up. It was delicious! *Also, it can be quite spicy if you use the fire-roasted diced tomatoes as she recommends. That, combined with the red pepper flakes and it can be a bit hot. I just used normal diced tomatoes to keep it a little more tame. It worked wonderfully.


I'm obviously not as skilled at picture-taking as the blogger with the Pinterest photo, but the food was still so very tasty!

This is a dish I would highly recommend, especially if you enjoy lasagna - it really is quite similar in taste. At least mine seems to be. I'm not normally a soup eater, but this is hearty enough, it doesn't seem real soup-y. So, whether you are a soup-eater or not, hopefully you'll be able to enjoy this dish as much as my family and I have.


Friday, June 14, 2013

He or She - Which Will It Be?

I wanted to find a creative way to share the news of the gender of our unborn child. With Cade, our two year old, we had an amazing baker friend of ours make 2 cakes as we were going to be revealing it to our families at different times. One of the cakes revealed the gender based on the color of the frosting on the inside of the cake. The other cake revealed the gender based on the color of the actual cake on the inside. Both tasted marvelous and it was so much fun to share that with our family in that way! Here is one of the cakes that was made. Isn't it darling?


Well this time, we decided to change things up a bit. I wanted our son to be involved in the big reveal, so I went to Pinterest for ideas. Most of the ideas consisted of balloons and cakes which are very cool - but I know people who have done both recently...I wanted something different. Then I found Gender Reveal Play-dough! It starts out white and turns blue or pink as you play with it!
Photo from Pinterest

The Pinterest link that I was directed to went to an Etsy site (which you can check out, here) - but I was fairly certain this was something I could make on my own...so I did some searching. I found out it's called magic play-dough and found a link on how to make my own here.

It was very simple to make and didn't take a lot of time. Some of the dough turned out better than other parts of the dough, and I'm not sure why - but I was able to get what I needed out of it, and that's what mattered to me. 

 After kneading the dough for a while, I rolled it into balls and then put a crevice in it to fill with food coloring.

 Then, I covered it up with a layer of the dough so that it would hide the color.
 Put it in the play-dough container (or a ziplock baggie, which I also did with others), and put a lid on it.


The results were fantastic! It made an awful lot of play-dough, so I made extras in different colors for my niece and nephews to play with as well. They all seemed to have a blast watching the colors come out in their dough. I took pictures of that, but this is already a picture-heavy blog, so I won't include those for right now. 

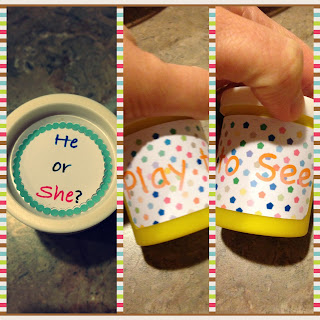
I took some old mini play-dough containers and labeled one of them. 


Here is my husband (who did already know the gender of our unborn child, but was playing with our son) and my son playing with the magic play-dough. By the way - I made the shirt for my son. I'm pretty proud of it. I'll talk about that in another post though, since I also made one for our little one on the way.


Ok, so this picture doesn't have a lot to do with the play-dough, but he was so dang cute, I just had to post it!
 Drum Roll Please....


That's right, we're having a girl!! 
This was such a fun way to play with play-dough and share our news. I'd recommend, even if you have no news to share - if you make play-dough with your kids this way, they'll have a blast and so will you. It's fun to watch the color form. Sometimes it does take quite a bit of kneading, so don't feel too discouraged if it doesn't work right away. There will be color, it'll just start out looking a little more...tie-dyed, which is also cool.

So, there's the news for today! We also shared the news in another way, which I will post later - this one was more Pinterest oriented and way fun whether or not you are having a little one!