Monday, April 29, 2013

Pasta With Fresh Tomato Sauce

We had another meatless Monday - with great success. Tonight's recipe comes from Martha Stewart, but to stay true to my blog - I discovered it through Pinterest. This, my friends, this recipe is a keeper. Oh so yummy. To see the recipe, check out Miss Martha's blog here.

Photo from Pinterest
Doesn't that look divine? Ok, so mine doesn't look anything like that...but it tasted REALLY good. Since I have my fancy blender (and, let's face it - I was feeling too lazy to cut anything on my own) and the recipe says you can put the ingredients into the blender on pulse, I did that instead. I had more of a sauce than what the picture seems to show, but it worked.

I also didn't have any plumb tomatoes, so I improvised and used the cherry tomatoes that I had. Plum tomatoes seem to be rather sweet anyway, so I figured that'd work ok, and I'd say it did. I also didn't have fresh parsley, so I used the dried stuff I had, that also worked just fine. We also used whole wheat spaghetti instead of regular which made me feel good - you know, ultra healthy and all...*snicker*

Ready to pulse it!

See, mine looks like an actual sauce. 
This was a refreshing, summery, light dinner. We had some fruit with it and would've had veggies if I had been on top of my game and purchased some ahead of time to make. But, alas, it was just a fruit and pasta (carbo-load) kinda night, I suppose.

Ok, it doesn't look nearly as appetizing, but it truly was

I would highly recommend this recipe. It doesn't look as good after being pulsed in the blender, but it was definitely tasty and you should give it a try...you know, if you want to.


Thursday, April 25, 2013

Vinegar Weed Killer

Tis the season for flip flops, sunglasses and weed-pulling! Well, it's actually not quite the season for flip flops, but thankfully we've had a few days that could convince me otherwise. Oh how I love the sunshine! I love being out in the sun. I like to have a reason to be out there though - sitting out there reading (which sounds absolutely delightful on a tropical island or next to a pool) doesn't sound quite as lovely as I look out over a weed-infested yard/driveway. Ok, I don't soak up the sunshine from the driveway unless I'm washing my car - but the weeds are still growing in the cracks of my driveway and it is driving me crazy!

So, I took matters into my own hands, thanks to Pinterest! Yesterday, I made my own solution of vinegar and soap for a weed killer - to see the directions for this, check out this blog. There are so many amazing uses for vinegar - it's pretty much a go-to ingredient for a lot of home cleaners and other remedy-ish type stuff. Very cool.

Photo from Pinterest
I didn't take a picture of the spray bottle or anything, because I'm pretty sure you get the idea - but I filled my spray bottle (a recycled SHOUT spray bottle) full of vinegar with probably a spoonful of dish soap. I would not recommend testing this out on your beautiful lawn as is done in the picture above because as the blog linked above states - the vinegar pretty much kills whatever it's sprayed on - so...unless you want a lovely brown spot - that may not be a good idea. I'd recommend you test it on your neighbor's lawn first if you want to see if it won't ruin your grass. I kid! Don't do that...please.

Anyway, so I gave this a try the other day. Here is a picture of my weed-infested driveway.


Pretty, isn't it? I have not been looking forward to trying to pull those weeds out by the root. I sprayed them heavily with the vinegar solution and noticed a little bit of a difference the next day.


They are starting to die!! Granted - they are still there, but they are withering! Die, evil weeds, die! Die! Die! Ok...got that out of my system. I think I'll try spraying it one more time to see if that takes care of the little buggers - but as you can see - it does work at least a little bit! I bet those weeds will be easier to pull now that they are flourishing with life. hehe.

Anyway, I will continue to use my vinegar solution and be thankful for this great tip on Pinterest. I hope it works out for you as well!


Thursday, April 18, 2013

Baked marbles

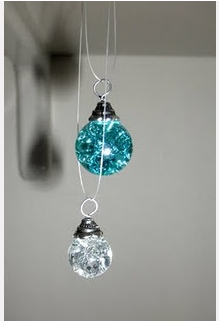
This is something I've been wanting to try for a while, but who knew finding marbles would be so hard?! I finally found some cheap marbles at the store and Gabe (my nephew) and I couldn't wait to give this little experiment a try. To find out how to make this, check out the link here.
Photo from Pinterest
Ok, so this is very simple. And, a little tip I learned from the blog (after I'd already bought the marbles), the marbles you will want to use can be found in the floral section of a craft store - you want colored, but clear marbles. Unfortunately, we didn't have any of those marbles, so we went with the next best thing - as solid of a color as we could find in them! We chose blue and white. 

This was before they went in the oven - don't mind the gunky pan...that's for a later Pinterest Test

After they came out of the oven and were put in ice water, they did crack, but you have to look really closely.


I, unfortunately, didn't have a pendant-hangy-thing to glue to the top of these to make them into necklaces or anything, but that's ok - I don't necessarily think they are pretty enough that I'd wear it (or want to give it to anybody) anyway.

The neatest thing about this was the fact that they did break- but only on the inside! They were still marbly-smooth on the outside. In fact, upon further testing by my awesome son, throwing them on the floor didn't even break...er shatter them. Thankfully!

I am looking forward to trying this with solid colored marbles to see if it really is as pretty as it looks from the picture on Pinterest. (I'll update this post once that does happen.) For now, I am very skeptical. Either way, this is a fun little project that Gabe and I both enjoyed and we still have marbles to play with afterward! Score!

Wednesday, April 10, 2013

Soft Monster Cookies

Oh how I love cookies. Well, in all honesty, I love most food - especially dessert. A few weeks ago, it was my turn to bring dessert to my home group Bible Study. So, I decided to try a new recipe I found on Pinterest (of course).

To see how to make this recipe, check out this blog.

Photo from Pinterest 
These cookies boasted a statement that I read on Pinterest as being "...soft, super peanut buttery and studded with chocolate chips, M & M's and peanut butter chips. These are my new fave." I expected pretty much nothing but amazingness out of these little beauties.


The blog post recommends smashing the cookies down as they don't spread at all, so I did a little test - as you can see, half of the cookies I put on the cookie sheet I flattened and half I didn't. 


Obviously, the blog post was correct - they really don't spread much. This is a picture from after the cookies were taken out of the oven. After this batch, I tried smashing the cookies down with a fork, as you would do with normal peanut butter cookies, but the dough just got stuck in between the prongs, so that didn't work as well as I would've liked. I, personally, don't think the smashed-down-cookie look appears to be all that appetizing.

As the blogger had done, I made a double batch of these cookies and oh-mama did I have too many cookies! But, that's ok. It's always better to have too much than not enough, I suppose.

A friend of mine had one of these cookies before I brought them to home group to make sure that they were good enough to share (since my tummy hasn't been liking me much, I needed someone else's opinion). She (and my husband) both felt that the cookies were ok but left you feeling very parched.

If you make these cookies, be ready to have a tall glass of milk (or the beverage of your choice) available, otherwise you may not receive the full enjoyment these cookies have to offer.

I don't know that I'll be making these cookies again. I have other peanut butter cookie recipes that I could probably add ingredients to that may be better than these - but they were still worth a trial and they weren't a disaster. And, from what I heard, the folks in our home group seemed to enjoy them as well...or so they said... hehe.

Still...a cookie is a cookie - as long as there are no nuts or raisins. So, I'd say these turned out a-ok.


Thursday, April 4, 2013

An announcement!

First off, I want to start by apologizing for my lack of blog posts in the last month or so. Sadly, I've been feeling fairly rotten and my ability to complete Pinterest projects has been far more limited. But, hopefully all of that will change soon and hopefully I will have my energy back again soon.

In the mean time though, let me tell you my reason for my lack of posts - specifically for my sickies - through a Pinterest test I have recently completed.

I started by getting my toddler a shirt and (using my Silhouette Cameo machine - which is the most amazing machine on the entire planet for creative-type people) I printed out what I wanted his shirt to say onto vinyl. Then, I weeded out the negative that I wanted to be sure to paint and stuck the vinyl on the shirt.


Using the Silhouette brand fabric paint, I then laid down some paint onto the shirt.


The finished product was pretty impressive, if I do say so myself. I thought it looked pretty cool.


If you don't have a Silhouette Cameo, you can also go to this blog that I got off of Pinterest, and she'll teach you an alternative way of creating a shirt similar (or whatever you desire the shirt to say). Check it out, here.

So...all of this to say - big news in the Kravitz household!! Baby #2 is on the way!! I apologize for my lack of posts, and hopefully I will be feeling less zombie-like in the coming weeks and will be able to do more posts (and better yet, more tests!) yet again, but in the meantime - I'm excited, enthusiastic and even more so because I was able to share the news with you in such a way that I still did a Pinterest project too! WOOHOO!

Here's to more blog posts, more babies, and less nausea! Yay!