Tuesday, November 26, 2013

The Thanksgiving Tablecloth

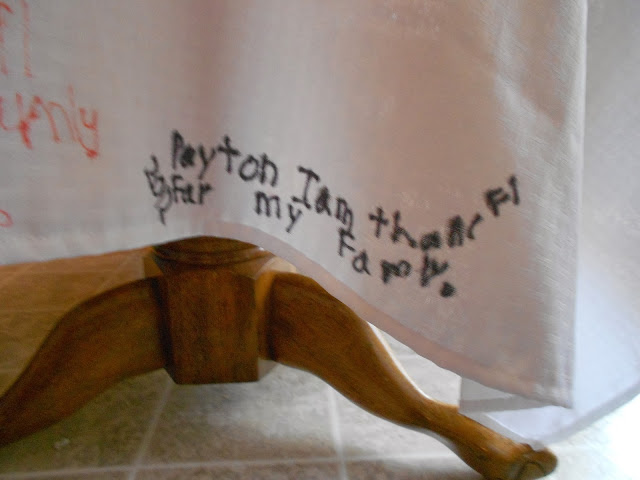
Last year, I discovered a grand idea. I'm unsure if I found it on Pinterest or not, but I loved the idea and we implemented it for Thanksgiving. So, I thought I'd share it with you all: The Thanksgiving Tablecloth.

It requires very little supplies and, I think, using it year after year will be so special - seeing what everyone has written.

Here's what you need:
A plain, white tablecloth
Some sharpies
Your loved ones around your dining room table

That's it!

All you do is have everyone write something that they are thankful for that year on the tablecloth, sign and date it and you have a keepsake for years to come!


We even had our kids write what they were thankful for. What a treasure this will be!


Some of our little ones were too young to write it themselves, so they had help from their older siblings.


I'm excited to see this tablecloth get filled up with thoughts of thankfulness.


Seeing who is at our table each year will be a memory you will forever be able to treasure.


I am excited to have this tradition follow us through the years and hopefully the generations!


I hope you've enjoyed this and, maybe can start your own traditions around the Thanksgiving table with the Thanksgiving tablecloth.


Today, friends, I am thankful. I thank God for all that I have, all that I've gone through and for those who have blessed my life - whether I am still in contact with them or not. I am blessed and thankful. 

Happy Thanksgiving!

Thursday, November 21, 2013

Maternity Necklace

I don't normally blog advertisements, per se, but I am just too excited about this and I did find out about it on Pinterest. So, I'm counting it as a Pinterest test.

Since being pregnant, I've gone through the normal happenings of a pregnant lady: swollen hands, swollen belly, swollen feet. Most of the time, these things don't phase me all that much. But, my hands have become so swollen that Im not able to wear my wedding ring and I don't like that. Thankfully, I discovered something I had never seen before. A Maternity Necklace! You can wear your ring around your neck. It's not really that novel of an idea, I mean, really, put a chain around your neck and slip your ring on it, but I didn't have a chain and I just didn't want to do it that way. Until I saw this terrific idea on Pinterest.

Necklace can be purchased by going here
I fell in love with this idea! It just looks classy and pretty and yeah...I just really liked it. Unfortunately, I found this at the end of my pregnancy and it seemed silly to buy it at this point. Especially because it was over $100!! Yeah...too much for me. Although, I can think of other rings I would use for it after my wedding ring would fit back on my pudgy fingers. Like, putting one of my dad's rings on there. Since he passed away, I've had a few things of his and would love to wear them from time to time, but mostly can't find a way to do that. This would make that possible. Oh well...$100 plus was just not what I was willing to pay right now.

However, I did some more searching on Etsy and I found another necklace, one I liked even better that was less than half the cost of the necklace above (including shipping!!). So, I got it!

To check out this necklace, go here
Because I am so very near my due date, I asked for the necklace to be shipped with expedited shipping. The merchant was so gracious! She didn't even charge me extra for it. Awesome!! It came in the mail a few days later. The width of my wedding band was just a little wide, so it was a bit difficult to get the clasps fastened, but I did it, and I love it.

I've gotten lots of compliments on it and it is very lightweight. I won't be able to put my dad's ring on it, but I am certain I can find another use for it. Maybe even just clasping the hearts together. I would recommend, if this is the one you are going to get, measure your ring and be sure it will fit in the clasps. That would be my one warning. Otherwise, yes. This. This is terrific.


Tuesday, November 19, 2013

Ice Cream Bread

I love carbs. I love bread. I love ice cream. Ice cream bread doesn't sound like there could be anything bad about that, right?? I found it on Pinterest, of course, and couldn't wait to give it a try.

To check out the recipe, go here.


Oh my, how excited was I to try this recipe!! I didn't have any chocolate ice cream, so I went with what I did have: chocolate chip cookie dough.

I followed the recipe as written, mixing the ice cream and the self-rising flour until it was well-mixed and then popping it in the oven. Easiest recipe ever.


It still looks pretty dry, but I think that's more just the picture. I mixed the daylights out of that dough.


After it went into the oven, I waited with baited breath for a taste of this delicious bread. It came out of the oven and I waited just a few more minutes for a taste. Unfortunately...it really didn't look all that good. Again, it doesn't look like I mixed it well enough, but I don't know what more I could've done. It was just very dry.


Even more unfortunate: it didn't taste all that good. I had a friend over and she tried a piece (daring soul) as well, she thought it tasted a bit dry but that it would be really good with coffee. I actually tried this test many, many months ago and had planned on trying it again before blogging about it. I didn't want to give up on it, but I have yet to do that, so I'm posting about it. I wouldn't say this is a "loser" recipe...but it's not the moist, lovely consistency I was hoping for. The biggest reason I haven't tried it again is for fear that I will waste, yet again, 2 cups of delectable ice cream. I'm just not sure I'm willing to make that sacrifice. Someday I will. And I'm sure when I do, the bread will be perfect. This was probably a fluke. But, until that happens, I'm gonna have to call this a Pinterest fail.

Tuesday, November 12, 2013

Pom Poms and Butter Bowls

Quite a while ago, I remember seeing something about helping to develop the fine motor skills in youngsters by cutting a hole in the top of a container and giving them little colorful pom poms to put in the container. For the life of me, I have no idea where I saw this idea now...I can't find it on my Pinterest page and I'm fairly positive I was not creative enough to come up with this one on my own. ha! However, since I can't find it on my Pinterest page, I will - for the moment - claim it as my own brilliance...though we all know differently.

This was cheap, quick and I'm fairly certain it couldn't have been easier. The pom poms are from the dollar store and, as you can see, it was not a tiny bag. There are plenty of them for my son and my nephew and any other child who may be interested in playing with this as well - all at the same time.

I started by, obviously, washing out the container and letting it dry. Then I cut a small hole in the lid. I did my best to make sure the hole was just a bit smaller than the pom poms, so as to make this a little more challenging for my son. I think for a very little child, a bigger hole would be a better idea, but since my son already has developed some fine motor skills, I thought this may just help hone them a bit.


After it was cut, Cade was intrigued and had a great time playing with the pom poms and getting them into the hole - which did prove to be a bit of a challenge, but he managed with a smile on his face. 


After a few minutes, he enjoyed taking the lid off and throwing the pom poms all over the room...that wasn't as much fun for me. However, we then worked together to put them all back in the container. In the process of adding them all back in, we worked on colors and counting - counting how many pom poms we were putting in and talking about the colors of each pom pom. It was a great lesson and he has been enjoying emptying and putting them back in for a few days now. For such an inexpensive project, I'd say this was a definite hit! I'm glad I thought of it... he he he. 


P.S. Someday my son may resent me for all of these "diapered baby" pictures on my blog, but I will just remind him that getting him dressed was just not worth it as he preferred to be a little nudist. hehe! 

Tuesday, November 5, 2013

DIY Children's Growth Ruler

Hellooo there!  I am excited to be filling in for Heidi as she loves and cuddles on her new baby girl!!!  You might be wondering who I am and others of you may know me.  I am a wife of 15 years to my darling hubby, Josh; a mom to two loving children, James age 12 and Hope age 9; I am a blessed child of a Savior who loves me and gave everything for me and I am a craftaholic.  I love to craft!  Ok, maybe I didn't emphasize that enough.  I LOVE TO CRAFT!!!  It doesn't matter if its scrapbooking, crafting with paper, wood or fabric.  I enjoy sewing but struggle with knitting.  My wash cloth I am trying to knit has been sitting 1/3 of the way completed for at least 3 months.  Another passion of mine is fitness and nutrition but that's a topic for another day!

My babies are no longer so little.  My first born just turned 12 and I have enjoyed looking through some pictures of him growing up this last week.  He was and still is so cute!  We have a tradition that on our kiddos birthday we mark on the wall how tall they are.  Well, when we moved we couldn't take that wall with us!  At least, not with the new owners being very happy with us.

Pinterest to the rescue again! Solution: DIY Children's Growth Charts.  They are customizable in so many different stains, fonts and any other way you can think of.


This is the one I have made for our family.  Hopefully, this week I can get their heights added to the ruler. I'm just ecstatic to finally have it hanging up!

I don't have pictures of each step along the way but I will take you step by step through the process.

Step 1: Purchase a board at your local hardware store such as Lowe's or Home Depot.  My board is 6'x12".  When I choose my board I like to look at the grain and see which one has the character in it I like.  I also look for knots.  I love what they add to the board but I want to make sure they do not align with where I may want to paint a number, line or document their height.

Step 2: Lightly sand and wipe with damp cloth.

Step 3: Stain.  I chose a stain from Minwax.  #224 Special Walnut

If you haven't stained before, relax!  It is super easy.  I place my board on two saw horses and use one of the cheap foam brushes you can get anywhere.  I swipe the stain across the board with the brush, working in then with handful of paper towels I go over it wiping of the excess stain.  I work in 2 foot sections.  I don't stain the whole board and then wipe.  I just work my way down the board until it is all covered.  Let it dry for a couple hours and then flip and do the same thing to the other side.  My board only has one coat of stain but if you prefer it darker you can do more.  I usually let my board, after it is all stained, sit outside in the garage over night.  It's stinky and will feel a little greasy.  Letting it sit over night seems to take care of both of those issues.

Step 4:  While your  board is drying you can create your numbers on your computer.  I picked a simple font and size that was pleasing to me.   My numbers are roughly 2" in size.  Print them and cut them out about the size of a playing card.  This allows extra paper around the number for when you tape your number to your board.

Step 5: So your board is all dry, stink free and ready to have the lines painted on it!  I have found the easiest tool to use to paint the lines on is a paint pen.  You can find them at Craft Warehouse, Walmart or any store that has a craft section.  I have even found them in the paint section at Bi-mart.    I use my handy dandy ruler and mark with a pencil every inch going up the left side of my board.  I make a 3" line for every 6" (this will be your foot and 1/2 foot markings) on your ruler and 2" line for inches.  YOUR BOARD STARTS AT SIX INCHES.  That means your first line should be 3" long.  After I have written the lines on the board in pencil I go over it with my paint pen.


Step 6: Once my paint dries, I tape my numbers on the board at the foot markings.  Remember your board begins at 6".  Using a rounded pencil or ball point pen, trace the outside edge of each number.  You don't have to push really hard but firm pressure is needed.  This will leave an indent in the wood for you to use for your paint pen to trace and fill in.  

Step 7:  After your painted numbers dry, spray it with a matte clear acrylic sealer. 

Step 8:  Put a saw tooth hanger on the back and embellish any way you desire!

I used my Silhouette Cameo and cut out my children's names, birth date and stats in vinyl and placed them going up the right side of the board.   Another idea I am contemplating is modge podging a picture, of the corresponding year, on the board by their height.


These make great gifts for baby showers or even great gifts for soon to be or new grandparents.  They're just a little awkward to wrap and deliver. :)

Thanks for letting me share my Pinterest test with you today.  I can't wait to hear what creative ways you come up with to customize your board!

Happy Crafting!! ~Christina